
by: Vtkljnky
|
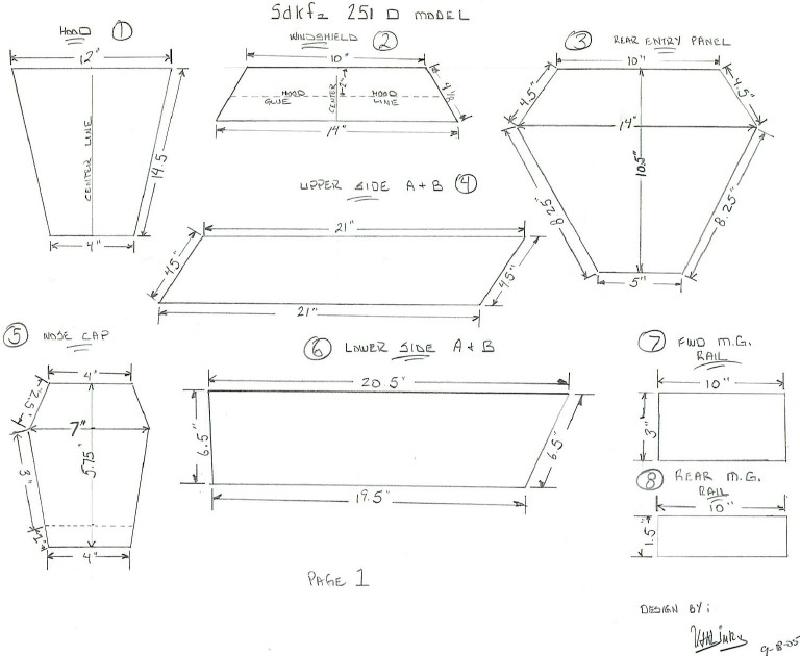
Step 1: Place #10 on a flat surface. Using Scotch or Masking tape place the lower sides #6 A & B on the top of #10 at the edge. Tape to floor pan.
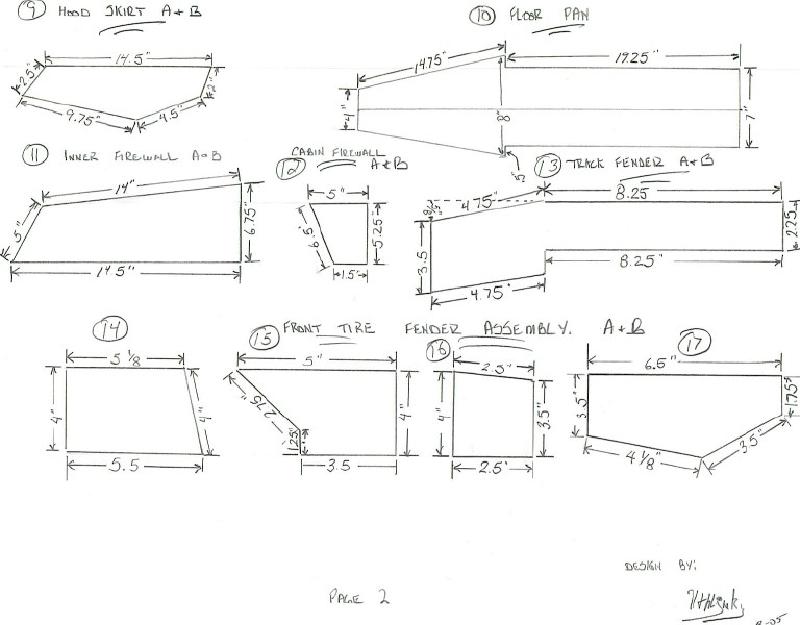
Step 2: Place #3 on the inside edge of both #6 A & B tape in place. Step 3: Place #4 A & B on the outside edge of #3 Rear Entry and tape. Tape along the edge where Upper Side #4 And lower side #6 meet. Step 4: Tape #12 A & B cabin firewall to the inside edge of # 6A & B. Tape #2 Windshield to the top edge of #12 A & B and the inside edge of upper panel #4 A & B. This should complete the basic rear compartment from firewall to rear entry. Step 5: Place the Inner Firewall panels #11 A & B on the floor pan #10. Tape ˝ inch from outside edge to floor # 10 and then to the firewall #12 A & B. Step 6: Tape # 5 Nose Cap to forward edge of panel #11 A & B. Place Hood Panel # 1 at windshield # 2 "hood glue line" and top edge of nose cap #5 and tape. Step 7: Place panels 9 A & B at outside edge of Hood # 1 and forward edge of panels 4 A & B and outside edge of nose cap #5 and tape. Step 8: Place Panel # 7 forward MG rail on the top edge of #2, 4 A & B and tape. Place panel # 8 rear MG rail on top edge of # 3, 4 A & B and tape. This will give you a basic 251 without the fenders in place. I suggest that once this trial fit meets your own approval start gluing or whatever medium you will be using together. This will give you a solid work area and see how well your project is coming together. All Glued? Changes and modifications made? Cool, lets continue. Step 9: Mark a straight line rear to front on # 6 Panels A & B approximately 3 ˝ " from the top edge of panel # 6. Next glue # 13 A & B track fenders to this line Step 10: From the notch on #10 measure 5 ˝ " and mark. Next glue #17 fender A & B from this mark at the bottom to the front edge of track fenders #13 A & B. Next glue # 16 A & B to the forward edge of the bottom of #17 the ˝ " outside ledge of #10. Next, glue # 14 A & B to the inside face of #5 and the bottom edge of # 9 A & B. Next, glue #15 A & B at the rear edge of # 14 and The forward edge of #16. That should do it! Depending on what type of material you use for your project will determine how much repair you can make in building this vehicle. The side tool boxes can be made to either a 251D model or the 251 A or C models it is entirely up to the builder. GOOD LUCK! VTKLJNKY OUT. |
CLICK HERE FOR NEXT PAGE
Back to the Tips