
by: Devil 505
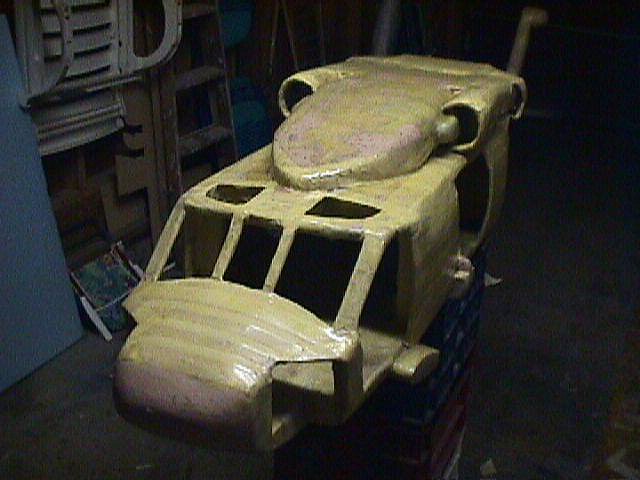
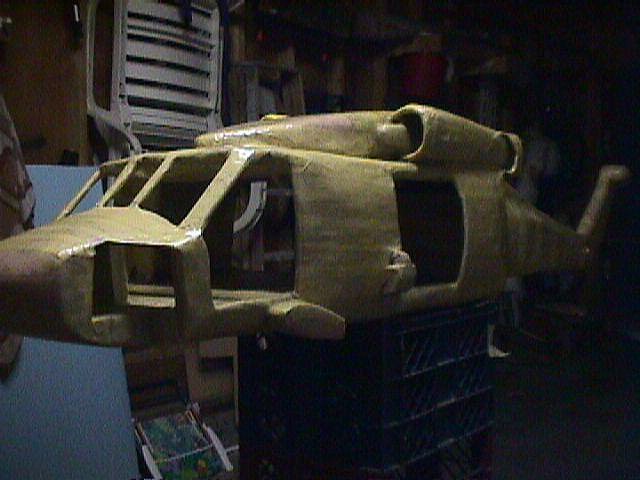
The Pavehawk Project : This is just the basics of how it was done. I used a ton of masking tape. 5 1/2 rolls to be exact. I'll explain how I used it in a moment. A 4'x 8' sheet of 2 inch foam insulation board is a must. The blue stuff seemed to work well. Liquid nails, the caulking type construction adhesive. About 2 gallons of Polyester Fiberglass resin. And about 15 -20 feet of 1/8th fiberglass mat. It usually comes in 4 foot width. Now, plan on ruining at least one change of clothing or get your self a pair of coveralls. The fiberglass part of the project is messy, if you've never done it before. Have some acetone on hand for clean up. Latex rubber gloves save the hand, I can't say any more there!! OK, I started with a 1/2 inch PVC, skeleton. I made a box then "T"ed the tail boom off of it. I gave the tail boom "vertebre" every 4 inches or so. The vertebre were made out of the foam. I passed the PVC through the foam and secured it with liquid nails. The tail itself was carved and shaped out of a piece of foam also. The foam carves easily with a good hack-saw blade. You can mold and shape the foam with sand paper. I used a pad-sander. I used foam and card board to shape the body of the aircraft from this point. Some areas had to be built up a layer at a time. The foam and card board where held in place with the masking tape and liquid nails. Now, understand that Polyester Resin eats foam. So you can't just apply the fiberglass straight to the project. I covered the whole thing, inside and out, with masking tape. I gave it a solid skin. The tape also allows you to contour some of the areas that my need some building up. Once I covered it with the tape, I began the fiberglassing portion. MESSY !!!!! Just a tip. If you have wide open spaces to cover, like the belly, use a big piece. BUT , if it's a tight spot use several small pieces. Dry-fit the pieces of mat before you apply the resin. This will allow you to cut notches and trim before the mat is soaked with resin and you end up getting your scissors or knife all messed up with resin. Once the fiberglassing is done, I used Bondo body filler to fill any cracks or holes, or to just fill in low spots. Once you've Bondoed, then the thing gets 2-4 coats of just resin to smooth it out. I sanded the thing in between each coat, just to take off the high spots. The doors are basically card board with the masking tape skin and a layer of fiberglass matting. I cut out the windows after the fact. The cock pit doors are hinged with small finish hinges. The main cargo doors are glued to the side in the open position. I glued the doors in place after the whole thing was painted and pretty much all done. The windows are 1/8th inch plexiglass scrap that I got at the local glass shop. If you put i9t in the oven at 400 degrees for 4-6 minutes, it molds and shapes to where you need it. For the bubble windows in the nose, I had to re-heat several times due to the fact the piece would cool quickly, and I didn't want to break the stuff. The landing gear is just 1/2 inch PVC with various couplings to give it the right look. The tires are giant scale aircraft model tires, for R/C planes. % inch tires I believe. The main rotors are just 1/8th inch plywood. 4 pieces, 4 feet long and 4inches wide. I did a sandwich job at the main hub assembly to give the individual rotors more support. The rotors are bolted to the main rotor hub. For the hub I used a 4 inch ABC plumbing flange. It's a toilet flange. The thing that holds your toilet to the floor. GET A NEW ONE !! Don't go used on this item !! For the interior, I just scratch built seats out of foam and 1/4 inch dowels, some masking take and some elastic for the harnesses. The main console/dash, is just foam and cardboard. I did do the tape job on it and fiberglassed it for strength. For the read-outs and switches, I drew out a instrument panel on paper. I copied it from a picture of an instrument panel I found. I then made a transparency photo copy. I painted the back side a dark grey. When you turn it over, you get all your gauges and switches, on a dark background. The crew seats are just 1/4 inch dowel wired together. I used an old OD green shirt for the cloth on the seats. Hot glue gun comes in handy for the finish stuff. I found some great decals for giant scale R/C models, at a hobby shop that worked great. I bought a 5 light system that runs off 6 volts that was made for giant scale R/C air craft, so the bird has lights. Over all it was a fun project. I spent too much time in the garage for my wife's liking. It got a little messy at times, but now that I've done it once I know how to prepare. I hope this inspires some of you to give it a try. Even if you make something else, like a Huey, or a boat, or what ever. The process could be the same. If you don't want to give it a try, just send me about...oh $800. + half the shipping. I f I got down a good system, I could probably do 2-3 maybe 4 at a time. Oh, that's right...I only have a single car garage... I'd have no place to put them. e-mail me if you need help with the scale conversions. I have some great tips for coming up with plans. Have fun and keep up the great work troops. Devil 505 tax_medic_2000@yahoo.com 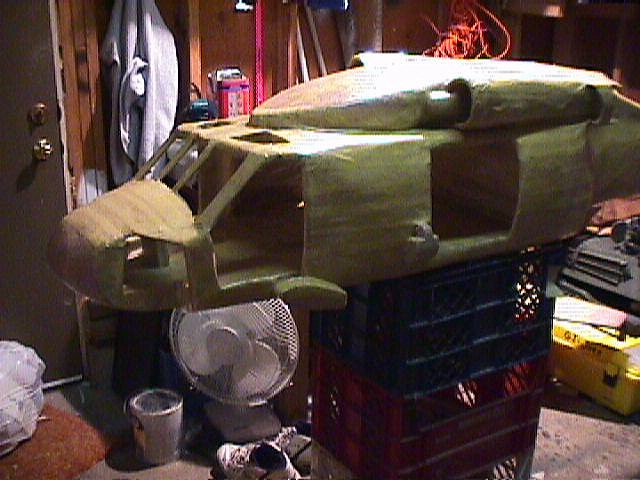
A very sharp salute to Devil 505 for sharing this awesome information with us! |
Back to the Vehicle Tips