
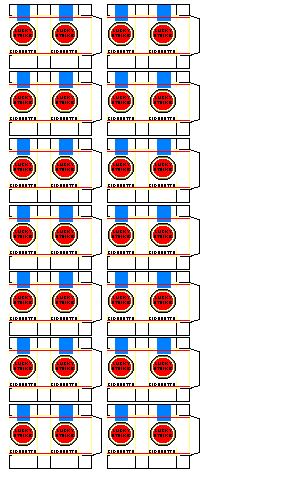
TIP FROM GREENLEADER Here's a little tip for making a quick and easy 1/6th scale brick building for your troops. This is a little idea I came up with for you guys to make your building customizing and town scenes a little easier. All you do is just get a bunch of big boxes, cut out some holes for doors and windows, and cover it like wallpaper with the brick texture that I've made for you. And you can click here to get it. You're not going to be able to download this onto your hard drive, but all you have to do is once you get to the brick texture page, just hit print on your brower and type in the number of copies you need. Make sure when you're cutting these things out to get all the edges sharp, because your wallpaper has to be even, or you'll get a very uneven look when you paste them together. You might want to flip each piece over on the back after you've printed it and mark which side is the top. Because when you paste them together and cover your building, you need to make sure that the tops and the bottoms are all glued on the same way. I usually just print it out on a sturdy stock paper, cut it out with a papercutter or exacto knife with ruler, then cover the back with glue (I used just standard paper glue), and stick it to your box. The reason why I use the sturdier stock paper is because it doesn't warp when you put glue on the back. Make sure you check out all printed copies under strong lighting conditions (like daylight) before applying the glue. I say this because if you're printer runs out of ink (like mine did), sometimes the color will be different, but just so slightly different under normal house lighting conditions that you might not notice. But, boy oh boy, when you take it outside, you will! So you don't want to screw up your brick building by putting two colors of brick on. You might want to take a little bit of maroon and white paint, and touch up some of the seams after you've glued and pasted them to make it flow a little more evenly and realistically. Actually, I just cut the windows and the doors out first, then completely covered them with the brick, then I cut a hole with an exacto knife right in the middle where the door or window would be, used a pair of scissors to cut from the center to each of the four corners of the door or window, then just simply folded the flaps inward and glued them down to the inside of the box. Of course, with door frames and window frames, you can get a lot more creative than I did here. Mine is just in it's basic form. You know you could cut pieces of cardboard and wrap them with pieces of the brick, and use them for brick ledges above the doors and below the window. And use balsa wood for things like wooden window frames and doors. You can even use the plastic from the front of your uniform carded sets as glass for your windows. Good luck! TIP FROM CHECKMATE KING 2 I'm really glad y'all like the crates pictured in my photo sets on the photos page. The response has been overwhelming! My wife trys to keep me busy around the house with home improvement projects. One such project involved the use of the thinest, cheapest, 4'x8' piece of wooden, lattice you can buy. This is the cross hatched stuff some people put around the bottoms of their decks & porches. Ya know what I mean ? It's kind of like a camo skirt for your deck so you can't see the crud under it. Anyway, I had a section leftover and rather than throwing it away, I took it apart because I could see in my mind that this was good enough for scale lumber. I measured different lengths for different uses. It looked to me that either 5 or 6 rifles would look best per crate so I measured the width & length as needed. You need 6 pieces of the same length to make the top, sides and bottom. Then you need 4 pieces the same width to make the ends of the crate, the cross pieces that hold the lid together and the groved sections inside the crate to hold the rifles neatly. Get ready ! You need a fast drying epoxy glue. Something that will cure in 5 minutes. Take one of your end, width pices and split it into 1/4" strips. You only need 2 strips per box. These are your cross members for the lid. Then take another end width piece and split it so you have 2 pieces. One piece will be about 3/4's the piece and the other is a 1/4 of the size. These are for the interior of the crate. Just set them aside for now. Take one of your long pieces and lay it on the table in front of you. Then get your glue ready and your 2 shorter end pieces. Quickly glue both sides of the smaller end pieces and place them on either end of the longer piece. Once they're in place set you other longer piece on top of them (those ends should already have glue on them). I use a clamp and lightly hold the frame together at this point. Then I turn the frame down like it rest normally on the floor and spread glue across the edge of the shorter end pieces. Now lay 2 more longer pieces along the length of the box to form the bottom of your crate. You can put something with some weight on the bottom pieces you just layed in place. Now let it dry for 5 or 10 minutes. While this is drying you can now take your 2 pieces of wood you split for the interrior and notch them to receive your rifles. I use a Dremel Tool. I measure the length of the piece and mark the middle. This will be the center position for the rifle. Then I measure over and make my marks for 2 positions on either side ot the center. Using the smallest of the round sanding bits I notch the wood where I made my marks and usually go down about half the diameter of the round sanding bit. Do the same thing to the smaller half of the wood but don't go down as far with the sanding bit. By now the basic crate is dry. Take the clamp and weight off of it and turn it right side up. Now position you last two pieces of the longer wood along the top. Space it how ever far apart you want it. Mix up a little bit more glue and get your 2 little 1/4" pieces ready to form your lid. Put glue on one side of the cross piece and look doown on the crate. See where your end pieces are and place the cross member just inside where you see the end of the crate. Do the same thing quickly on the other end. You do this because you don't want you lid to slip around and fall in on your rifles. Once that is done all you have to do now is take a rifle of choice and see where you want the interrior rib to catch the forearm of you rifle. Do a dry run first (no glue) Put the smaller piece up against the end of the crate and glue it inplace. Once you have determined where you want the cross rib to sit, glue the bottom of it and set it in place. Let it dry, paint it if you want to and add rope handles by drilling 2 hole in either end of the crate and use nylon string for rope handles and it's ready for the armory or supply convoy. I've made custom crates for M1 Garand's, M-16A2's, AK-47's, M4's, AT-4's, Dragon's, grenades and general supply crates such as medical supplies or ammunition. I think I have a thing for supplies ! TIP FROM WILDCARD Make your own custom Sandbags. CLICK HERE TIP FROM COSMIC BABY Make your own WWII German Lamp post Display Base. CLICK HERE TIP FROM FALLSCHIRMARTZ Make your own Building Ruins from Styrafoam. CLICK HERE TIP FROM TC Adding Comic Dialog Balloons to your photos CLICK HERE TIP FROM WILCARD How to Build Buildings CLICK HERE TIP FROM ILAF Build a Wagon wheel CLICK HERE TIP FROM BC RIES Make some WW2 Japnese Ammo crates CLICK HERE TIP FROM ILAF How to make molds and cast your own piecesl CLICK HERE TIP FROM ILAF Add a background to your photo using Paint Shop Pro CLICK HERE TIP FROM SGT. HOWARD Calvados Bottles .. "What to do and drink in Normandy" CLICK HERE TIP FROM DEWBACK MATT How to build a Suitcase or a Briefcase CLICK HERE TIP FROM L. GALLUP Create your own 1/6th 1941 Popular Science Magazine. CLICK HERE TIP FROM ILAF Help with building your own Plastic Injection Machine (Not an actual step by step tip, but if you're thinking about doing a little casting, then this tip should get you started at least. Not for the inexperienced) CLICK HERE TIP FROM SGT. HOWARD Lucky Strikes Cigarette packs Print and make your own Lucky Strikes cigarette packs. Download them and adjust to proper size with an image view or your printer (however if you use the standard PAINT program, they will print at proper dimenstions), then just print. Then cut them out, fold them over and glue them together. RIGHT CLICK HERE TO SAVE TO YOUR COMPUTER TIP FROM STEVE WOOD Using clear plastic to create plastic tarp covers. In this set he uses clear plastic to create a Vietnam rain poncho. CLICK HERE TIP FROM OKIMBORED Painting Plastic Furniture (Barbie, etc.) with Krylon Fusion Spray Paint CLICK HERE TIP FROM SGT. HOWARD Create a 1/6th scale solar powered street light. CLICK HERE TIP FROM SGT. HOWARD Add real wooden shingles to your 1/6th buildings CLICK HERE TIP FROM SOLDIER B 1/6th Scale WWII American Comics & German Magazines CLICK HERE TIP FROM RICH Assembling Printables from the Cincinnatti Ohio Chapter of the SS-CC CLICK HERE |
Back to the Tips